
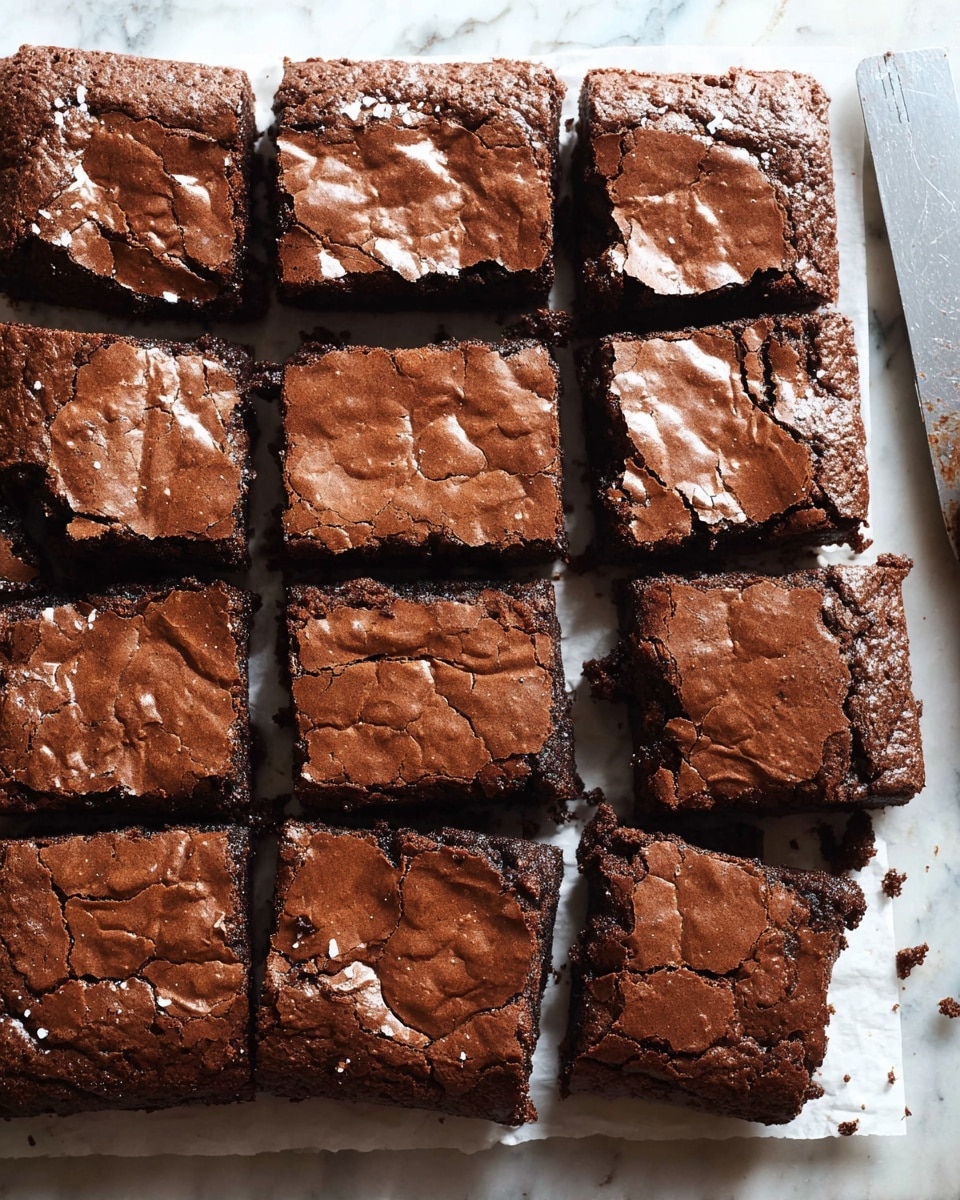
My Perfect Chocolate Brownie Recipe
There’s something truly magical about the perfect brownie, isn’t there? This My Perfect Chocolate Brownie Recipe has been my go-to for years—I keep coming back to it because it strikes that perfect balance between fudgy and cakey, rich yet not too sweet. It’s the kind of brownie that feels like a warm hug on a rainy afternoon or a star player at any potluck or family gathering.
What makes this recipe special to me is how approachable it is without sacrificing flavor. Whether you’re making brownies for a quick treat after dinner or baking to impress guests, My Perfect Chocolate Brownie Recipe always delivers reliably. Plus, with a handful of practical tips I’ve gathered from trial and error, you’ll be able to nail it every single time.
Ingredients You’ll Need
Each ingredient plays a key role in creating that dreamy texture and intense chocolate flavor. When shopping, look for good quality dark chocolate with around 50-60% cocoa—it really makes a difference!
- Dark chocolate: Choose 50-60% cocoa for a rich but not overpowering flavor.
- Butter: Unsalted is best here, and it helps create that luscious fudgy texture.
- White sugar: Adds sweetness and tenderness; you can reduce it a bit if you want less sweet.
- Brown sugar: Brings moisture and a subtle caramel note.
- Large eggs: Room temperature gives better mixing and lift; I love how 3 eggs give balance but reducing to 2 amps up the fudginess.
- Vanilla extract: A small splash that brightens the chocolate flavor beautifully.
- Flour: Just enough for structure without drying the brownies out.
- Cocoa powder: Unsweetened cocoa deepens the chocolate taste and adds that classic brownie color.
- Salt: Essential for balancing sweetness and enhancing chocolate.
- Walnuts: I toast mine for extra crunch and a toasty flavor; completely optional but I find they add great texture.
Variations
I love how versatile My Perfect Chocolate Brownie Recipe is—you can easily tweak it to fit your mood or dietary needs. Whenever I make these brownies, I often try new twists to keep things fresh and exciting.
- Nut-free version: Simply skip the walnuts—I’ve done this for friends with allergies, and they still come out amazing.
- Extra fudgy: Use just 2 eggs instead of 3 and slightly less flour; it’s a surefire way to get a denser, gooier bite.
- Chocolate chip surprise: Stir in some dark or milk chocolate chips into the batter—I love catching that melty, gooey chunk mid-bite.
- Espresso kick: Add a teaspoon of espresso powder to intensify the chocolate flavor without making it taste like coffee.
- Peanut butter swirls: Drop spoonfuls of peanut butter into the batter and swirl it through before baking—trust me, it’s a game-changer.
How to Make My Perfect Chocolate Brownie Recipe
Step 1: Melt the Chocolate and Butter Gently
Start by breaking the dark chocolate into pieces and melting it with the butter. I like to do this in a heatproof bowl over simmering water (a double boiler), stirring often until smooth. It might be tempting to microwave it for speed, but going slow keeps the chocolate silky and prevents it from burning.
Step 2: Sweeten the Mix with Sugars
Once your chocolate and butter have cooled slightly, whisk in the white and brown sugars. This step is key—too hot and you risk cooking the sugars, too cool and they won’t dissolve well. The sugars blend beautifully here, creating a glossy, rich base for your brownie batter.
Step 3: Add Eggs and Vanilla with Care
Next, add the eggs one at a time, beating gently to combine. I like to make sure each egg is fully mixed before adding the next to keep the batter smooth. Then stir in the vanilla extract—it really lifts the flavors and adds warmth.
Step 4: Mix in Dry Ingredients
Sift together the flour, cocoa powder, and salt before folding them into the wet mixture gently. Overmixing here can cause the brownies to be tough, so fold just until no streaks remain. This step is where the balance of fudginess and cakiness forms, so take your time.
Step 5: Fold in Toasted Walnuts
Finally, fold in the toasted walnuts. Toasting brings out a richer nutty flavor that pairs beautifully with chocolate—plus it adds a lovely crunch contrast. If you’re nut-averse or baking for someone with allergies, skipping this step works just fine!
Step 6: Bake and Test for Doneness
Pour the batter into a lined baking pan and bake in a preheated 175°C (350°F) oven for about 25-30 minutes. Use a toothpick dipped in the center to check doneness—it should come out with moist crumbs rather than wet batter. This baking time achieves that perfect fudgy yet slightly cakey texture.
How to Serve My Perfect Chocolate Brownie Recipe
Garnishes
I often serve these brownies plain because they’re so rich and flavorful on their own. But when I want to dress them up, a dusting of powdered sugar or a drizzle of warm caramel sauce is my go-to. Fresh berries or a dollop of whipped cream add a lovely brightness, especially if you’re serving them as dessert.
Side Dishes
Pair these brownies with a scoop of vanilla ice cream for a classic combo that never fails to impress. If you’re in the mood for something lighter, a simple mixed green salad with citrus vinaigrette helps balance out the richness when served after dinner.
Creative Ways to Present
For birthdays or holidays, I like to cut the brownies into bite-sized squares and serve them on a pretty platter, sprinkled with chopped nuts or mini chocolate chips. Another fun idea is layering brownies with whipped cream and berries in a clear glass for an easy yet elegant dessert parfait.
Make Ahead and Storage
Storing Leftovers
I store any leftover brownies in an airtight container at room temperature, and they stay perfectly moist for up to 3 days. If your kitchen is on the warmer side, I recommend refrigerating them to keep the texture spot on—just bring them back to room temp before serving for the best flavor.
Freezing
I’ve frozen these brownies wrapped tightly in plastic wrap and then foil for up to 2 months. When I’m ready to enjoy them, I thaw them overnight in the fridge and let them sit at room temperature before eating—this method keeps them tasting fresh and fudgy.
Reheating
To warm leftovers, I pop brownie squares in the microwave for 10-15 seconds. It’s long enough to soften them up without drying them out. Adding a small dollop of butter or a scoop of ice cream alongside really elevates the experience, especially if they’re a day or two old.
FAQs
-
Can I use milk chocolate instead of dark chocolate in My Perfect Chocolate Brownie Recipe?
You can absolutely swap in milk chocolate, but keep in mind it will make your brownies sweeter and less intense in chocolate flavor. If you prefer that milder taste, go for it! Just consider cutting back on the added sugar slightly so the sweetness stays balanced.
-
What’s the best way to get fudgy brownies in My Perfect Chocolate Brownie Recipe?
Use 2 eggs instead of 3 and avoid overbaking—check for moist crumbs with a toothpick around 25 minutes in. Also, less flour tends to mean fudgier brownies, so feel free to reduce the flour by 10-15 grams if you want them extra gooey.
-
Can I make My Perfect Chocolate Brownie Recipe gluten-free?
Yes! Try using a 1:1 gluten-free flour blend designed for baking. The texture might be slightly different, but the brownies will still be deliciously chocolatey. Just make sure your cocoa powder and other ingredients are certified gluten-free if you’re avoiding traces.
-
Why do my brownies turn out dry sometimes?
Dry brownies usually mean either overbaking or too much flour. Keep your oven temperature accurate, and test them a little before the recommended baking time is up. Folding dry and wet ingredients gently to avoid overmixing also helps maintain moisture.
-
What can I substitute for walnuts if I want a different texture?
Pecans, hazelnuts, or even toasted coconut flakes work wonderfully as alternatives. You can also leave nuts out entirely if you prefer a smooth, nut-free brownie—My Perfect Chocolate Brownie Recipe still shines without them.
Final Thoughts
My Perfect Chocolate Brownie Recipe isn’t just a dessert—it’s a warm, comforting ritual I love sharing with friends and family. The simplicity combined with rich flavors makes it a crowd-pleaser every single time. I hope you enjoy making these brownies as much as I do, and that they become a staple in your kitchen too. Trust me, once you nail this recipe, everything else will just feel like a bonus!
Print
My Perfect Chocolate Brownie Recipe
- Prep Time: 15 minutes
- Cook Time: 30 minutes
- Total Time: 45 minutes
- Yield: 16 brownies (approximately 4×4 cm squares) 1x
- Category: Dessert
- Method: Baking
- Cuisine: American
Description
This Perfect Chocolate Brownie recipe creates rich, fudgy brownies with a deep chocolate flavor enhanced by a mix of dark chocolate and cocoa powder. The combination of white and brown sugar gives the brownies a balanced sweetness and chewy texture, while optional toasted walnuts add a delightful crunch. Ideal for chocolate lovers seeking a classic homemade treat.
Ingredients
Chocolate and Butter
- 150 g dark chocolate (50-60%)
- 120 g butter
Sugars
- 160 g white sugar
- 75 g brown sugar
Wet Ingredients
- 3 large eggs (room temperature; use 2 eggs for fudgier brownies)
- 1.5 tsp vanilla extract
Dry Ingredients
- 90 g flour
- 30 g cocoa powder
- 1 tsp salt
Optional
- 50 g toasted walnuts (optional; can increase up to 80 g for nuttier brownies)
Instructions
- Melt chocolate and butter: Gently melt the dark chocolate and butter together using a double boiler or microwave in short bursts, stirring frequently until smooth and fully combined. Set aside to cool slightly.
- Mix sugars and eggs: In a separate bowl, whisk the white sugar, brown sugar, and eggs together until the mixture is pale and slightly thickened. This ensures a good texture for the brownies.
- Add vanilla and chocolate mixture: Stir the vanilla extract into the sugar and egg mixture, then slowly pour in the melted chocolate and butter mixture, folding gently until well combined and smooth.
- Sift and combine dry ingredients: Sift together the flour, cocoa powder, and salt to remove lumps and evenly distribute ingredients. Gradually fold these dry ingredients into the wet mixture to create a uniform batter without overmixing.
- Add walnuts (optional): Fold in the toasted walnuts if using, ensuring they are evenly incorporated throughout the batter for delicious nutty bursts.
- Prepare baking pan and bake: Preheat your oven to 175°C (350°F). Line an 8×8 inch (20×20 cm) baking pan with parchment paper and pour the batter in, spreading it evenly. Bake for 25-30 minutes, or until a toothpick inserted in the center comes out with a few moist crumbs but not wet batter.
- Cool and serve: Allow the brownies to cool completely in the pan before slicing into squares. This helps the brownies to set and enhances their fudgy texture. Enjoy them plain or with your favorite toppings.
Notes
- Using large, room-temperature eggs is crucial for proper texture; you can reduce to 2 eggs if you prefer fudgier brownies.
- The combination of white and brown sugar results in the perfect balance of sweetness and chewiness.
- Walnuts are optional; toast them beforehand to enhance their flavor and sweetness.
- To check doneness, insert a toothpick in the center; it should come out with moist crumbs but not wet batter.
Keywords: chocolate brownie, fudgy brownie, homemade brownies, walnut brownies, chocolate dessert