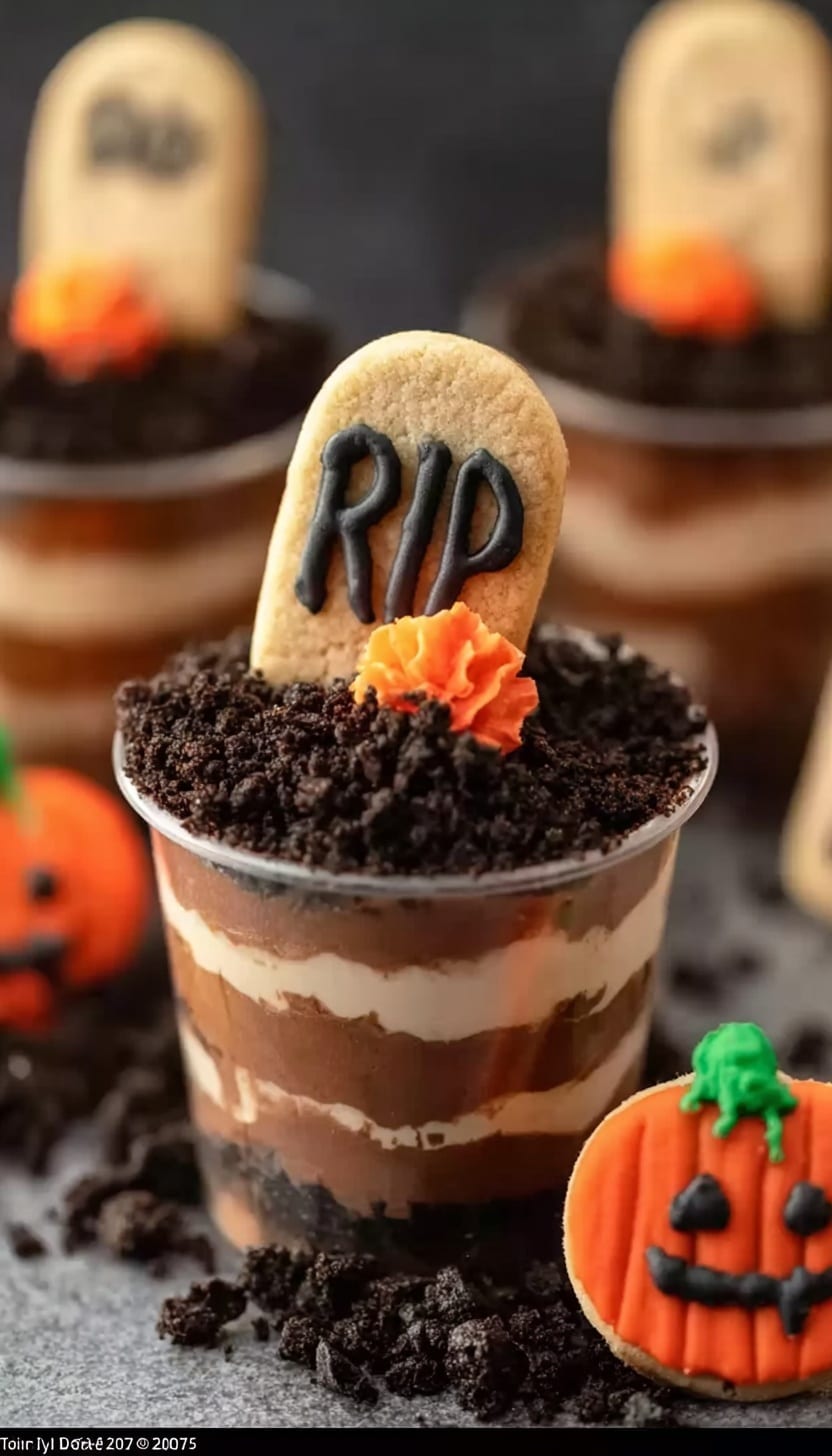
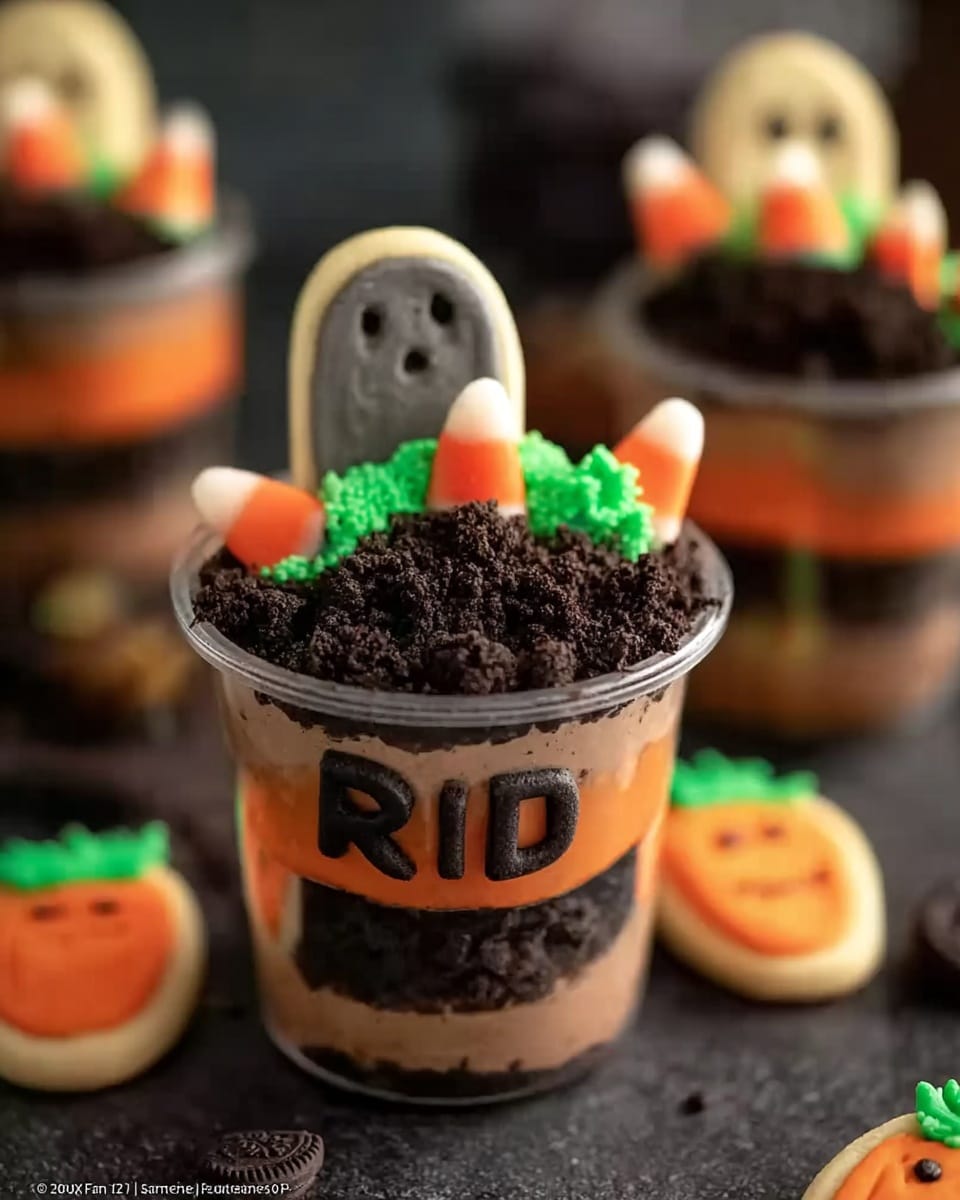
Halloween Dirt Cups Recipe
I have to tell you, this Halloween Dirt Cups Recipe is one of those treats that never fails to bring a smile, especially around spooky season. It’s fun, festive, and honestly, so simple to make that you’ll want to whip it up as soon as you get the craving. The combination of creamy chocolate pudding, crunchy Oreos, and those gummy worms just hits the perfect Halloween vibe every time.
Plus, if you’re throwing a Halloween party or just looking for a cute dessert to make with the kids, this recipe is pure magic. I love how versatile it is—you can dress it up with candy pumpkins or keep it classic. Trust me, once you get your hands on this Halloween Dirt Cups Recipe, it quickly becomes a go-to anytime you want something sweet and a little spooky.
Ingredients You’ll Need
These ingredients come together perfectly to create that rich, creamy, and crunchy texture that makes these dirt cups so irresistible. Plus, most of them are pantry staples or easy to find, which makes this recipe a breeze to pull off.
- Oreo Cookies: Crushed into “dirt,” they add that perfect texture and chocolatey crunch.
- Cool Whip: Lightens the pudding and adds a creamy softness that cuts the richness just right.
- Instant Chocolate Pudding Mix: The chocolatey base that’s thick, smooth, and oh-so-good.
- Milk: Needed to prepare the pudding, opt for whole milk for the creamiest results.
- Milano Cookies: These add a little extra texture and fancy touch when layered or crumbled on top.
- Gummy Worms and Candy Pumpkins (optional): Perfect for that festive, creepy crawly look (the kids love this part!).
- Wilton Black Writing Icing: Great for adding fun Halloween messages or eyes on pumpkin candies.
Variations
I’m all about making recipes my own, and this Halloween Dirt Cups Recipe is no exception. It’s a blank canvas for fun twists based on what you like or have on hand, so feel free to experiment!
- Peanut Butter Dirt Cups: I once stirred in a spoonful of peanut butter into the pudding layer—seriously delicious twist for peanut butter lovers.
- Gluten-Free Version: Swap Oreo cookies for gluten-free chocolate sandwich cookies, and you’re all set for guests with dietary needs.
- Vegan Option: Use dairy-free pudding and whipped topping alternatives; I’ve done this and still got rave reviews.
- Spooky Layers: Add a layer of crushed candy corn or use green-tinted coconut flakes for a “witchy” effect.
How to Make Halloween Dirt Cups Recipe
Step 1: Prepare the Chocolate Pudding
Start by whisking the instant chocolate pudding mix with 2 cups of cold milk. I like to whisk for about two minutes until it’s smooth and thickens slightly—this gives you that luscious, creamy texture that holds up nicely under the toppings. Let it sit for about five minutes to fully set while you get other ingredients ready.
Step 2: Crush the Oreos
Next, take your Oreo cookies and place them in a sealed plastic bag. Using a rolling pin or the bottom of a heavy pan, crush them until they resemble dirt clumps with some fine crumbs mixed in. I find leaving a few chunkier pieces adds texture and looks more like real soil!
Step 3: Fold in the Cool Whip
Now, gently fold the Cool Whip into your pudding mixture. This step is key—folding rather than stirring keeps it light and fluffy instead of dense. Trust me, the creamy contrast against the cookie “dirt” is what makes this recipe shine.
Step 4: Assemble Your Dirt Cups
Layer your dirt cups by adding a scoop of pudding mix at the bottom of clear cups or jars, then sprinkle a layer of crushed Oreos on top. Keep layering pudding and Oreo crumbs until your cups are full, finishing with that delicious “dirt” layer on top. If you want, crumble some Milano cookies in between layers for extra texture—I like this little surprise when biting in.
Step 5: Add the Creepy Crawlers and Final Touches
Pop gummy worms partially into the dirt so they look like they are crawling out—this is always a hit with kids and adults alike. Add candy pumpkins on top if you have them, and use Wilton black icing to draw fun details or spooky faces on your cups. It’s a simple step, but it really amps up the Halloween fun.
How to Serve Halloween Dirt Cups Recipe
Garnishes
I usually stick with gummy worms and candy pumpkins because they’re easy and festive. Sometimes I add crushed chocolate chips or mini Halloween sprinkles for extra flair. The key is to keep the “dirt” look authentic but playful, so edible eyes or spider-shaped candies can be a fun add-on too.
Side Dishes
This dessert pairs beautifully with lighter sides like a crisp apple salad or caramel popcorn to keep the Halloween theme going without overloading on sweets. If you’re doing a full party spread, a pumpkin soup or even savory finger foods balance the rich pudding nicely.
Creative Ways to Present
Last Halloween, I made these in little mason jars and tied orange ribbons around them—it made them perfect for party favors. You can also serve in clear plastic cups with black plastic spoons for a casual gathering, or layer them in a trifle dish for a more communal dessert. Adding a mini plastic shovel as a spoon? Instant wow moment!
Make Ahead and Storage
Storing Leftovers
I store leftover dirt cups covered tightly with plastic wrap or lids in the fridge—they stay fresh and creamy for about 3 days. The “dirt” might soften a bit overnight, but it’s still super tasty. Just add a few fresh gummy worms right before serving to refresh the look.
Freezing
Freezing isn’t my favorite for this recipe because the texture of the pudding and Cool Whip can change, becoming a bit grainy when thawed. If you must freeze, store in airtight containers and thaw slowly in the fridge. I recommend enjoying this treat fresh for best results.
Reheating
Dirt cups are best served chilled, so there’s no reheating. If leftover, just pop them back in the fridge. The cold creamy texture is part of the charm and makes the “dirt” feel wonderfully indulgent.
FAQs
-
Can I make Halloween Dirt Cups Recipe ahead of time?
Yes! You can prepare the pudding and crush the Oreos a day in advance. Just assemble the cups right before serving for the best texture, or assemble up to a few hours ahead and keep refrigerated. Adding gummy worms last-minute helps with presentation.
-
What can I substitute for Cool Whip in the Halloween Dirt Cups Recipe?
If you prefer homemade whipped cream or a dairy-free alternative, those work well too. I’ve swapped in coconut whipped cream before and still had tasty results, just make sure it’s stable enough to fold gently into the pudding.
-
Can I use different cookies instead of Oreos?
Absolutely! Any chocolate sandwich cookie will do, or even crushed chocolate graham crackers for a twist. Just pick cookies that will crumble nicely to mimic dirt texture.
-
Is the Halloween Dirt Cups Recipe kid-friendly?
Definitely! Kids love the fun presentation and gummy worms. It’s a quarantine-friendly, no-bake dessert that’s easy for little helpers to assemble too.
Final Thoughts
This Halloween Dirt Cups Recipe holds a special place in my heart because it blends nostalgia with simple fun. It’s that kind of dessert that invites you to get a little messy and make memories, whether with family or friends. I hope you enjoy making (and eating!) these as much as I do—trust me, they’re not just for Halloween; once you try them, they’ll be a happy treat all year round.
Print
Halloween Dirt Cups Recipe
- Prep Time: 15 minutes
- Cook Time: 0 minutes
- Total Time: 1 hour 15 minutes (including chilling time)
- Yield: 6 servings 1x
- Category: Dessert
- Method: No-Cook
- Cuisine: American
- Diet: Vegetarian
Description
Halloween Dirt Cups are a fun and festive dessert perfect for spooky celebrations. This easy no-bake treat combines crushed Oreo cookies, creamy chocolate pudding, and whipped topping to create a delicious ‘dirt’ base, topped with gummy worms and candy pumpkins for a playful finishing touch. Ideal for parties and kids’ gatherings, these cups deliver a delightful combination of textures and flavors with minimal effort.
Ingredients
Base
- 12 Oreo Cookies, crushed
Chocolate Pudding Layer
- 1 box Instant Chocolate Pudding Mix (3.3 oz)
- 2 cups Milk
Topping
- 16 oz Cool Whip
- 8 Milano Cookies, crushed
- Gummy Worms, optional
- Candy Pumpkins, optional
- Wilton Black Writing Icing, for decoration
Instructions
- Prepare the Pudding: In a medium bowl, whisk together the instant chocolate pudding mix and 2 cups of cold milk until thickened (about 2 minutes). Refrigerate for a few minutes if desired to set further.
- Crush the Cookies: Place the Oreo cookies in a ziplock bag and crush them into fine crumbs using a rolling pin or your hands. Separately, crush the Milano cookies into smaller pieces for added texture.
- Assemble the Dirt Cups: In clear cups or small dessert bowls, begin by adding a layer of crushed Oreos to represent the ‘dirt’. Next, spoon a layer of chocolate pudding over the crumbs, followed by a layer of Cool Whip. Repeat layering if your cup size allows, ending with a top layer of crushed Milano cookies to add crunch.
- Add Decorations: Decorate the tops with gummy worms and candy pumpkins to give your cups a festive Halloween look. Use the Wilton Black Writing Icing to draw spooky designs or write fun messages on the inside rim of the cups or on plates as desired.
- Chill and Serve: Refrigerate the assembled dirt cups for at least 1 hour before serving so the layers set well and flavors meld together. Serve chilled for best taste and texture.
Notes
- You can substitute Cool Whip with homemade whipped cream for a fresher alternative.
- Try different cookie combinations, like chocolate chip or graham crackers, for varied flavors.
- If you prefer a firmer pudding layer, use less milk according to pudding mix instructions.
- These cups can be prepared a day ahead and stored covered in the refrigerator.
- For a fun twist, add crushed peanuts or mini chocolate chips between layers.
Keywords: Halloween dessert, dirt cups, no-bake dessert, chocolate pudding cups, Oreo dessert, festive treats, kids dessert