Halloween Chocolate Cookies Recipe
If you’re anything like me, Halloween isn’t complete without something sweet to match the spooky vibes. That’s exactly why this Halloween Chocolate Cookies Recipe has become my go-to treat every October. These cookies are rich, fudgy, and perfectly soft with just the right hint of cocoa — everything you want when you’re craving chocolate but also want something festive to share. Plus, they’re so simple to whip up, which means you can spend less time baking and more time enjoying Halloween fun.
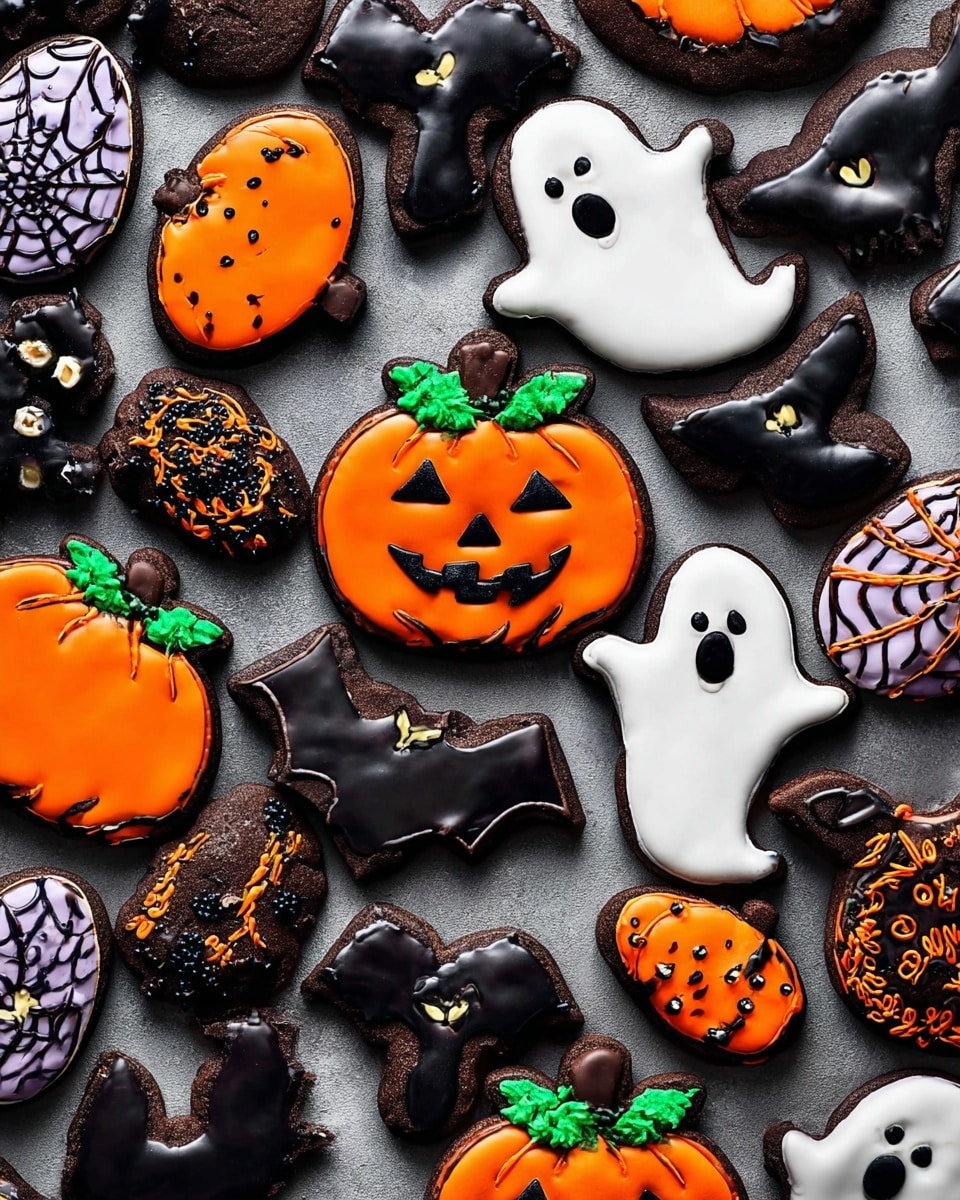
What I love most about this Halloween Chocolate Cookies Recipe is how versatile it is. Whether you want to keep them classic chocolate or get creative with fun royal icing decorations (hello, ghosts and pumpkins!), these cookies hold up beautifully. They also make fantastic party treats or thoughtful gifts, especially because their deep chocolate flavor feels a little indulgent but isn’t overwhelming. Trust me, once you bake these, you’ll find yourself reaching for the recipe every year.
Ingredients You’ll Need
Each ingredient in this cookie recipe plays a key role to deliver the ultimate soft and chocolatey texture. I always aim to use fresh, good-quality cocoa and vanilla because those flavors really shine through.
- All-purpose flour: I recommend spooning and leveling the flour rather than scooping to avoid dense cookies.
- Unsweetened natural cocoa powder: This adds the intense chocolate flavor; dutch process cocoa works well too if you prefer a smoother taste.
- Baking powder: Just a touch helps give the cookies a gentle rise without making them cakey.
- Salt: Balances the sweetness and enhances the cocoa’s richness.
- Unsalted butter: Softened to room temperature for easy mixing and that melt-in-your-mouth texture.
- Granulated sugar: Simple sweetness to balance the bitterness of cocoa.
- Large egg: At room temperature to ensure even mixing and a tender crumb.
- Pure vanilla extract: Adds warmth and depth — don’t skip it!
- Optional Royal Icing or Easy Cookie Icing: For decorating your cookies with fun Halloween patterns; gel food coloring lets you tint the icing any spooky shade you like.
Variations
I like to mix things up depending on the mood or the crowd. It’s fun to tailor this Halloween Chocolate Cookies Recipe in ways that keep it fresh and exciting, and I encourage you to do the same!
- Add chopped Halloween candy: Toss in mini candy bars or candy corn pieces right into the dough for a surprise crunch. I tried this last year, and my kids went wild for the candy bits hiding in the chocolate.
- Swap butter for coconut oil: For a dairy-free twist, coconut oil works well and lends a subtle tropical note.
- Use different icings: Royal icing holds up beautifully for detailed decorating, but a quick glaze with powdered sugar and milk works if you’re short on time.
- Make them extra festive: Sprinkle cookies with edible glitter or edible eyes for that creepy-cute Halloween vibe.
- Double chocolate chips: Add semi-sweet chocolate chips into the batter for extra gooeyness if you want a richer chocolate punch.
How to Make Halloween Chocolate Cookies Recipe
Step 1: Prep Your Dry Ingredients
Start by whisking together the flour, cocoa powder, baking powder, and salt in a large bowl. I always sift the cocoa to avoid any lumps—this helps keep the cookie dough smooth and easy to work with. Set this dry mix aside while you cream the butter and sugar.
Step 2: Cream Butter and Sugar
Using a stand mixer or hand mixer, beat the softened butter and granulated sugar together until light and fluffy, about 2-3 minutes. This aerates the dough, making your cookies tender and soft rather than dense. Don’t rush this step—it really makes a difference!
Step 3: Add Egg and Vanilla
Mix in the egg and vanilla extract until fully incorporated. Make sure your egg is at room temperature to prevent the dough from seizing. This step gives the dough moisture and binds the ingredients nicely.
Step 4: Combine Dry and Wet Ingredients
Gradually add your dry mixture to the butter mixture, mixing on low speed just until combined. Overmixing can ruin the texture and make your cookies tough, so keep an eye on the dough and stop when things come together.
Step 5: Chill, Roll, and Bake
Chill the dough for at least 30 minutes—it’s easier to handle and prevents spreading during baking. When ready, roll the dough into small balls, dusting them with cocoa powder if sticky. Place them on a lined baking sheet about 2 inches apart. Bake at 350°F (175°C) for 10-12 minutes. You want them just set, not hard; they’ll firm up as they cool.
How to Serve Halloween Chocolate Cookies Recipe

Garnishes
I always like sprinkling a little colored sugar or edible glitter on these cookies to amp up the Halloween spirit. When I have time, I pipe spooky shapes with royal icing — spiders, bats, or little ghosts are crowd-pleasers. Plus, colorful icing provides a fun texture contrast.
Side Dishes
Pair these cookies with a mug of warm apple cider, a creamy chai latte, or a cold glass of milk for the perfect fall combo. I find the slight acidity of cider complements the rich chocolate wonderfully. If you’re hosting kids, hot chocolate and cookies are always a winner!
Creative Ways to Present
For Halloween parties, I like laying out the cookies on a platter decorated with spider webs made from black licorice or cotton candy spun into “ghosts.” You can also arrange them inside treat bags tied with orange and black ribbons for easy, adorable take-home favors. Presentation really makes these cookies stand out and adds to the festive mood.
Make Ahead and Storage
Storing Leftovers
I’ve found that storing these cookies in an airtight container at room temperature keeps them fresh for about 4 days. Sometimes I put a slice of bread in the container to maintain softness—it’s a neat trick that really works! If decorated with icing, wait until it sets fully before storing to avoid smudging.
Freezing
If you want to make these ahead for Halloween, the dough freezes beautifully. I portion it into balls and freeze them on a tray before transferring to a sealed bag. When you’re ready, just bake directly from frozen, adding a couple extra minutes. This trick saved me last year when I ran out of time but still wanted homemade treats!
Reheating
If you have leftovers that have lost their warmth, pop a few cookies in the microwave for 10-15 seconds or warm them briefly in a 300°F oven. This revives their softness and that freshly-baked feeling. Just don’t overdo it—we want gooey, not hardened.
FAQs
-
Can I use Dutch-process cocoa instead of natural cocoa?
Absolutely! Dutch-process cocoa works well in this Halloween Chocolate Cookies Recipe. It will give you a milder, smoother chocolate flavor compared to the sharper taste of natural cocoa. Just note the color might be a bit darker, but the texture and deliciousness remain.
-
How do I keep my cookies soft instead of crunchy?
To keep your Halloween Chocolate Cookies soft, avoid overbaking them. Pull them from the oven when the edges are set but the centers still look slightly underdone; they’ll firm up as they cool. Also, storing them in an airtight container with a slice of bread can help maintain their softness.
- Can I decorate these cookies without royal icing?
Yes! While royal icing is great for detailed decorations, a simple glaze made from powdered sugar and a little milk or lemon juice works fine for quick decorating. Add gel food coloring to tint your glaze for festive colors—just brush it on and let it dry before serving.
- Is it necessary to chill the dough?
Chilling the dough isn’t absolutely mandatory, but I highly recommend it. It makes the dough easier to work with, prevents the cookies from spreading too much, and enhances flavor development. Even 30 minutes in the fridge can make a big difference.
- How long do these Halloween Chocolate Cookies stay fresh?
Stored properly in an airtight container at room temperature, these cookies stay fresh and delicious for about 4 days. If you want to keep them longer, freezing the dough or baked cookies is a great option.
Final Thoughts
This Halloween Chocolate Cookies Recipe has truly become a seasonal favorite in my kitchen. There’s something so comforting about baking up a batch of rich chocolate cookies while the fall leaves are turning and the Halloween decorations go up. Whether you’re baking with kids or need an easy yet impressive treat for a party, these cookies hit all the right notes — delicious, festive, and foolproof. I hope you love making (and eating) them as much as I do!
Print
Halloween Chocolate Cookies Recipe
- Prep Time: 20 minutes
- Cook Time: 10 minutes
- Total Time: 1 hour 30 minutes
- Yield: 24 cookies 1x
- Category: Dessert, Cookies
- Method: Baking
- Cuisine: American
Description
These Halloween Chocolate Cookies are rich, fudgy, and perfectly soft, made with cocoa powder and decorated with royal icing for a festive touch. Ideal for spooky celebrations, they combine the classic chocolate flavor with fun, colorful icing to delight kids and adults alike.
Ingredients
Cookie Dough
- 1 and 1/2 cups (188g) all-purpose flour (spooned & leveled)
- 3/4 cup (62g) unsweetened natural cocoa powder (or dutch process cocoa powder), plus more as needed for rolling and work surface
- 1 teaspoon baking powder
- 1/8 teaspoon salt
- 3/4 cup (12 Tbsp; 170g) unsalted butter, softened to room temperature
- 1 cup (200g) granulated sugar
- 1 large egg, at room temperature
- 1 teaspoon pure vanilla extract
Royal Icing or Easy Cookie Icing (Optional)
- Gel food coloring for tinting icings
Instructions
- Prepare Dry Ingredients: In a medium bowl, whisk together the all-purpose flour, cocoa powder, baking powder, and salt until evenly combined. Set aside to ensure these dry components are well mixed.
- Cream Butter and Sugar: In a large bowl, use a hand mixer or stand mixer to cream the softened butter and granulated sugar together on medium speed until the mixture is light and fluffy, about 3 to 5 minutes. This step incorporates air for a tender cookie texture.
- Add Egg and Vanilla: Beat in the egg and pure vanilla extract until well incorporated and the mixture is smooth. Scrape down the sides of the bowl as needed.
- Combine Wet and Dry Ingredients: Gradually add the dry ingredient mixture to the wet ingredients, mixing on low speed until just combined. Be careful not to overmix to avoid tough cookies.
- Chill Dough: Wrap the dough in plastic wrap and refrigerate for at least 1 hour to make it easier to handle and to enhance flavors.
- Preheat Oven and Prepare Surfaces: Preheat your oven to 350°F (175°C). Line baking sheets with parchment paper. Lightly dust your work surface and rolling pin with cocoa powder to prevent sticking when rolling out dough.
- Roll and Cut Cookies: Roll out the chilled dough to about 1/4 inch thickness using the cocoa-dusted surface and rolling pin. Use Halloween-themed cookie cutters to cut out shapes and transfer them carefully onto the prepared baking sheets.
- Bake Cookies: Bake in the preheated oven for 8 to 10 minutes or until the edges are set but the centers are still soft. Avoid overbaking to keep cookies tender.
- Cool Cookies: Remove cookies from oven and allow them to cool on the baking sheet for 5 minutes before transferring to a wire rack to cool completely.
- Decorate with Icing: Once cookies are fully cooled, decorate with royal icing or easy cookie icing tinted with gel food coloring for a festive Halloween look. Allow icing to set completely before serving or storing.
Notes
- Softened butter should be at room temperature to properly cream with sugar for the best texture.
- If dough is too sticky after chilling, lightly dust with cocoa powder when rolling.
- Use a plastic scraper or spatula to transfer cookies to prevent distortion.
- Store decorated cookies in an airtight container at room temperature for up to 5 days.
- For a deeper chocolate flavor, use Dutch-process cocoa powder; for a more natural chocolate taste, use natural cocoa powder.
Keywords: Halloween cookies, chocolate cookies, royal icing cookies, festive treats, Halloween dessert, cocoa cookies