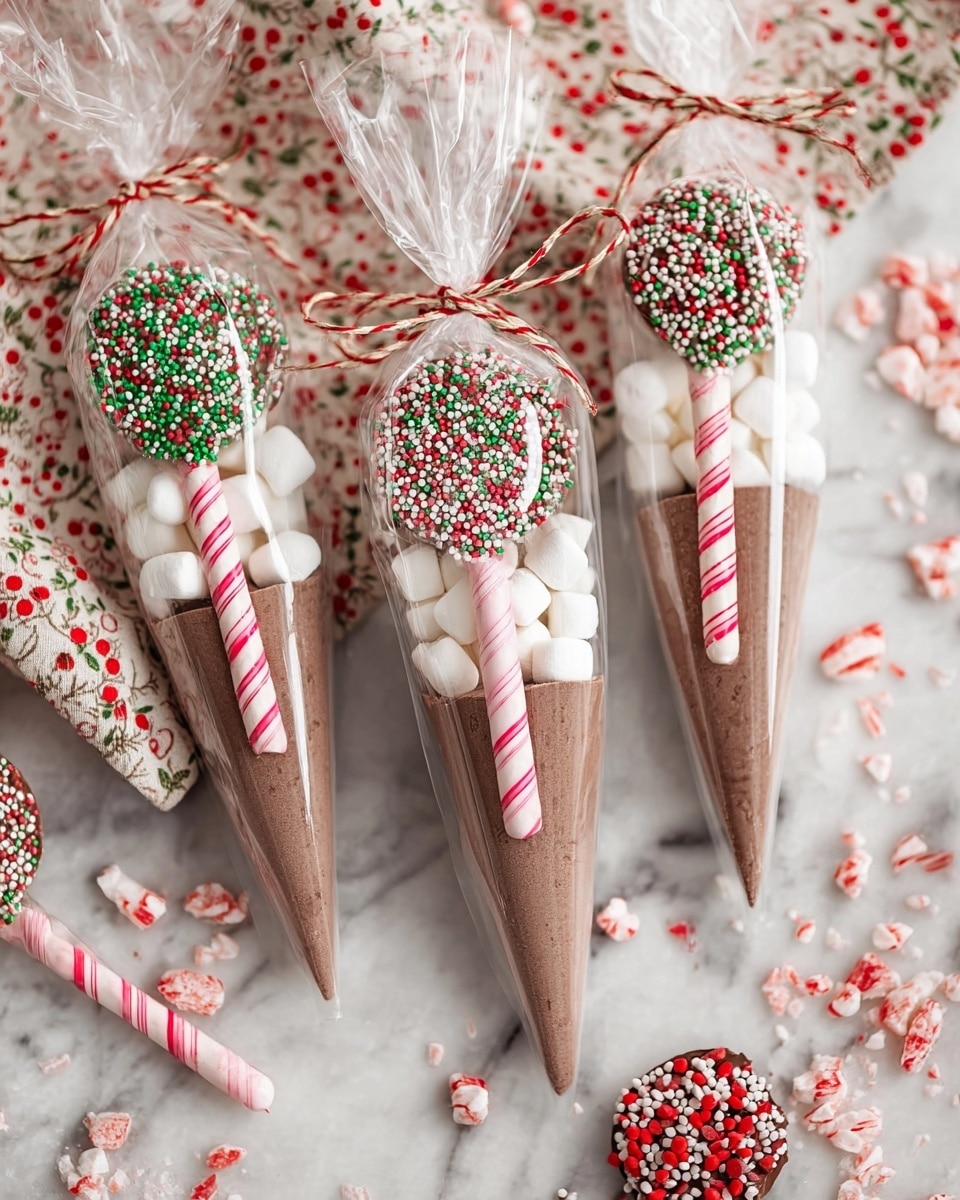
DIY Peppermint Candy Spoons Recipe
I absolutely love sharing this DIY Peppermint Candy Spoons Recipe because it’s just so much fun and perfect for the holiday season—or really any time you want to add a little peppermint magic to your drinks. There’s something so satisfying about melting candy and creating these cute spoons that add a festive twist to your hot cocoa or coffee. Plus, they’re super easy to make, which means you don’t have to be a kitchen pro to nail them.
What makes this DIY Peppermint Candy Spoons Recipe stand out is how versatile and festive it is. Whether you’re hosting a party, looking for fun gift ideas, or just want to treat yourself, these spoons make everything a little more special. I’ve gifted these plenty of times, and people always rave about the cool presentation and the delicious peppermint kick they add.
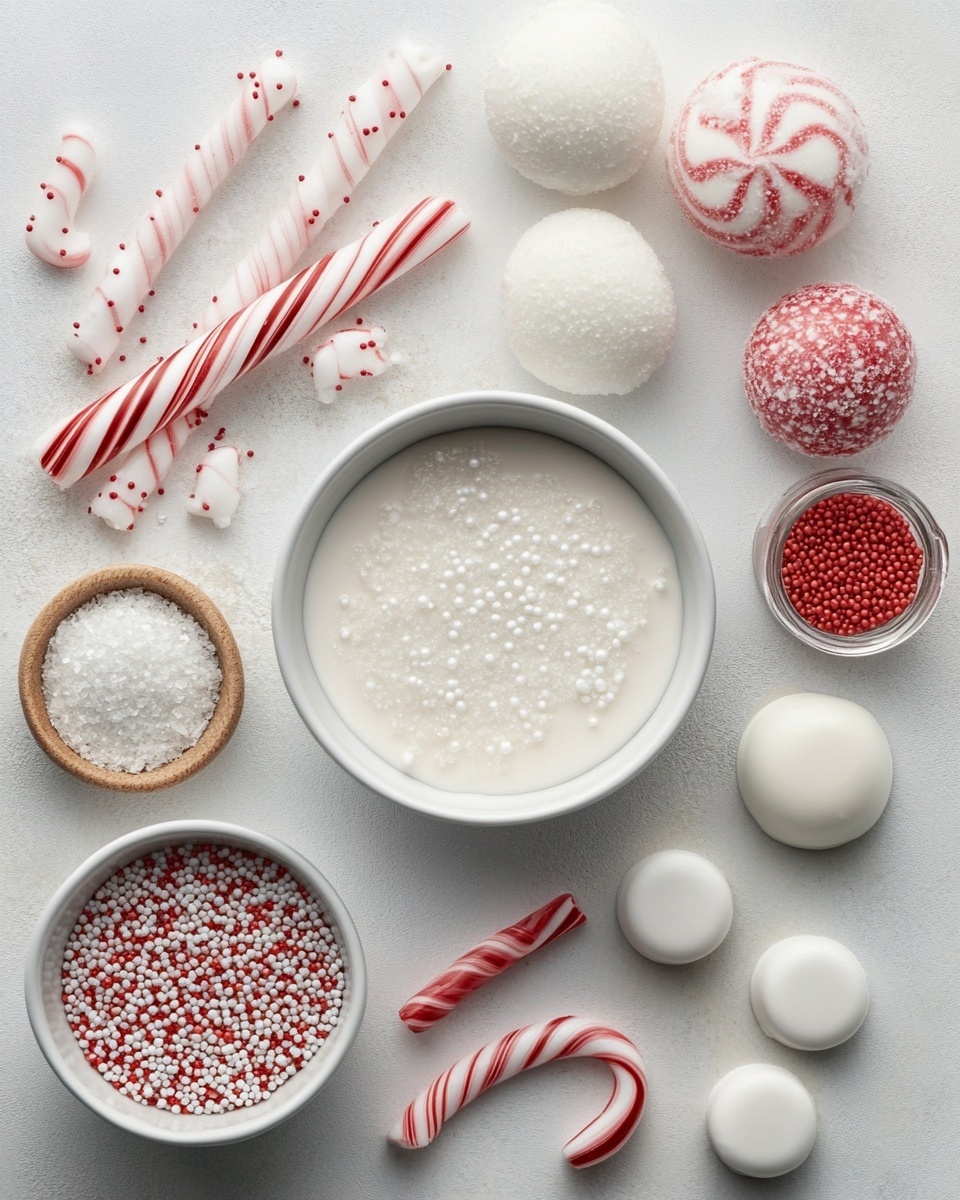
Ingredients You’ll Need
Choosing the right ingredients is the secret behind those perfectly minty, melt-in-your-mouth candy spoons. I always shop for quality peppermint candies and candy melts that melt smoothly and set nicely for that professional look.
- Starlight Peppermint Candy: These classic red-and-white candies bring that authentic peppermint flavor and crunch—just what you want for candy spoons.
- Wilton Candy Melts: I use these because they melt easily and harden with a nice glossy finish, making the spoons look polished and pretty.
- Holiday Sprinkles: They add a festive pop of color and texture, making each spoon feel extra special—perfect if you want to impress your guests.
Variations
One of my favorite things about this DIY Peppermint Candy Spoons Recipe is how you can make it your own. I often swap out the peppermint candies for chocolate pieces or try different colored sprinkles to match the occasion. It’s all about having fun in the kitchen!
- Chocolate Peppermint: I once added crushed dark chocolate with the peppermint candy for a richer twist—delicious and fancy without extra effort.
- Gluten-Free Option: This recipe is naturally gluten-free, so it’s great for sharing with friends who have dietary restrictions.
- Spicy Kick: For something different, I stirred in a tiny pinch of cayenne pepper into the melted candy melts—it’s a surprising but delightful combo.
How to Make DIY Peppermint Candy Spoons Recipe
Step 1: Prepare Your Workspace and Tools
Before you start melting candy, make sure you have everything ready and your spoons washed and dried completely. I like to line a baking sheet with parchment paper—this makes cleanup so much easier. Also, arrange your peppermint candies and sprinkles close by so you can work quickly once the candy melts are ready.
Step 2: Melt the Candy Melts
Use a microwave-safe bowl and melt your Wilton Candy Melts in 30-second intervals, stirring well in between. This prevents overheating and helps you achieve a smooth, glossy texture. You want the candy melts fluid enough to coat but not so hot they separate.
Step 3: Coat the Spoons
Dip each spoon into the melted candy, tilting it to coat the head fully, where your peppermint candies will stick best. Let excess drip back into the bowl. Trust me, taking your time here pays off; even coverage means the candies stay put and your spoons don’t look messy.
Step 4: Add the Peppermint Candy Pieces and Sprinkles
While the candy coating is still wet, press crushed starlight peppermint candies onto the spoons. I like breaking the candies into medium-sized chunks to get that crunchy texture without being too sharp. Then sprinkle your holiday decorations on top—it’s like putting the finishing touch on a present!
Step 5: Let Them Set
Place your spoons on the lined baking sheet and pop them in the fridge for about 15-20 minutes. This helps the candy set quickly and keeps the peppermint pieces nice and firm. Patience here makes sure your spoons won’t stick or break apart when you pick them up.
How to Serve DIY Peppermint Candy Spoons Recipe
Garnishes
I love topping my peppermint candy spoons with a little extra flair—sometimes a small edible glitter or a tiny candy cane shard for that extra sparkle. It’s those little touches that surprise people and make the experience even more festive.
Side Dishes
These spoons go beautifully with cozy winter treats. I usually serve them alongside thick, creamy hot chocolate or a warm mug of peppermint coffee. They’re also great with holiday cookies—trust me, your guests will thank you!
Creative Ways to Present
For my holiday parties, I place the peppermint candy spoons standing upright in a festive glass jar wrapped with twine and a holiday tag. It’s such an easy way to make them look stunning and gift-ready. You can also use them as edible stirrers at dessert bars—they always become a conversation starter!
Make Ahead and Storage
Storing Leftovers
Once your peppermint candy spoons have set, keep any extras in an airtight container at room temperature. They’ll stay crisp for at least a week, but honestly, they tend to disappear fast around here. I recommend storing them away from heat or humidity to avoid stickiness.
Freezing
I’ve experimented with freezing these spoons before, and while it’s doable, I find the texture changes slightly once thawed—the peppermint candy can get a bit soft. If you do freeze them, wrap each spoon individually in plastic to prevent odors from absorbing.
Reheating
If you want to freshen up the shine before serving leftover spoons, just let them come to room temperature naturally. Avoid heating directly—it can cause the candy coating to lose its texture. Sometimes, a gentle wipe-offs with a soft cloth helps restore their sparkle without melting them again.
FAQs
-
Can I use other types of candy instead of peppermint for this recipe?
Absolutely! While peppermint adds that classic cool flavor, you can customize the recipe with other hard candies or even crushed chocolate bars. Just make sure the candy pieces aren’t too large or they may not stick well to the melted coating.
-
What’s the best way to crush the peppermint candies?
I use a plastic baggie and gently tap with a rolling pin to break the candies into small, manageable pieces. This method helps avoid powdery mess and keeps the bits bite-sized and perfect for sticking onto the spoon’s coating.
- How long can I store the finished peppermint candy spoons?
Stored in an airtight container at room temperature, they stay fresh for about a week. Just keep them away from humidity and heat to prevent melting or stickiness.
- Can I make these spoons without candy melts?
You can try using white chocolate or any melting chocolate as a substitute, but candy melts are ideal because they set harder and hold the shape better. Chocolate may be softer and prone to melting with heat or moisture.
- Is this recipe kid-friendly?
Yes! My nephews love helping me make these peppermint candy spoons—they’re super simple and safe with adult supervision, especially during the melting and setting steps.
Final Thoughts
Honestly, I can’t recommend this DIY Peppermint Candy Spoons Recipe enough if you want to add a touch of joy to your winter beverages or holiday gifts. Making them feels like a little craft project that turns into something delicious and beautiful. So next time you’re craving that peppermint twist, give this recipe a try—you’ll be amazed how a small candy spoon can brighten up your day and your drink!
Print
DIY Peppermint Candy Spoons Recipe
- Prep Time: 10 minutes
- Cook Time: 5 minutes
- Total Time: 15 minutes
- Yield: Approximately 12 candy spoons 1x
- Category: Dessert
- Method: No-Cook
- Cuisine: American
- Diet: Vegetarian
Description
Create festive and delicious DIY peppermint candy spoons, perfect for stirring into hot cocoa or adding holiday cheer to desserts. This simple recipe uses crushed Starlight peppermint candies and Wilton candy melts to craft sweet, colorful candy spoons decorated with holiday sprinkles.
Ingredients
Ingredients
- 1 bag Starlight Peppermint Candy (approximately 12 oz)
- 1 bag Wilton Candy Melts (approximately 10 oz, color of choice)
- Holiday Sprinkles, for decoration
Instructions
- Prepare the Peppermint Candies: Unwrap the Starlight peppermint candies and place them in a sealable plastic bag. Use a rolling pin or a heavy object to crush the candies into small pieces, but not powder. Set aside.
- Melt the Candy Melts: Place the Wilton candy melts in a microwave-safe bowl. Microwave in 30-second intervals, stirring after each, until smooth and fully melted.
- Form the Candy Spoons: Line a baking sheet with parchment paper. Pour a spoonful of melted candy melts into spoon-shaped molds or make spoon shapes freehand on the parchment paper using a spoon. Sprinkle crushed peppermint candies and holiday sprinkles on top while the candy is still melted.
- Set and Harden: Let the candy spoons cool at room temperature or place them in the refrigerator for about 10-15 minutes until completely hardened and set.
- Remove and Store: Gently remove the candy spoons from the molds or parchment paper. Store them in an airtight container at room temperature or in the refrigerator until ready to use.
Notes
- Use silicone spoon molds for best shape results, or create freehand shapes on parchment paper.
- Be careful not to over-crush the peppermint, as larger pieces give a nice texture and festive look.
- Store candy spoons away from heat and humidity to prevent melting.
- These candy spoons make excellent gifts and holiday party favors.
Keywords: peppermint candy spoons, holiday treats, candy melts, festive desserts, DIY candy spoons