
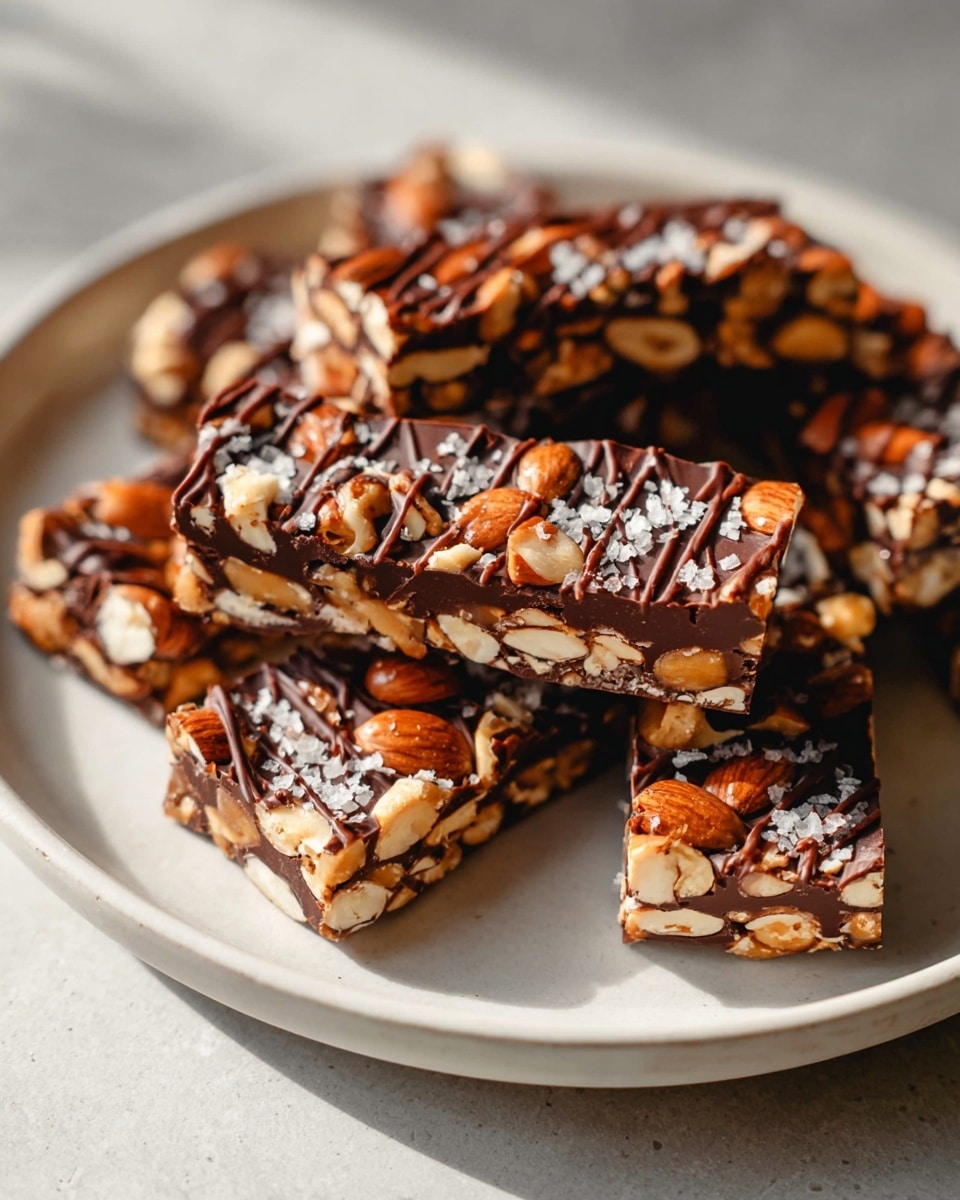
Dark Chocolate and Sea Salt Nut Bars Recipe
If you’re craving a snack that’s both indulgent and nourishing, you’ve got to try my Dark Chocolate and Sea Salt Nut Bars Recipe. These bars strike that perfect balance between crunchy nuts and that rich, bittersweet dark chocolate, all kissed with a hint of sea salt that just elevates every bite. Whether you’re packing lunchboxes or need a quick afternoon pick-me-up, these bars are fantastic for fueling your day responsibly without feeling like a compromise.
What I love most about this recipe is how simple it is to whip up, plus the way the natural sweetness from brown rice syrup and the pop of puffed rice add such satisfying texture and flavor complexity. Once you make these, you’ll understand why they’ve become one of my go-to homemade snacks that never fail to impress friends or satisfy those chocolate cravings guilt-free.
Ingredients You’ll Need
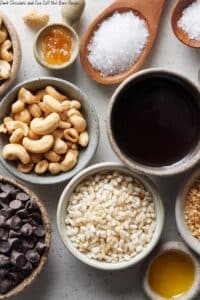
Choosing quality ingredients really makes a difference here. The mix of nuts and puffed rice gives a wonderful crunch, while natural sweeteners and good dark chocolate bring everything together. Here’s what to gather before starting, along with a few tips to get the best results.
- Unsalted nuts of choice: I love mixing cashews, peanuts, and almonds for variety in texture and flavor—feel free to use your favorites or whatever you have on hand.
- Puffed rice: Adds a delightful light crunch and keeps the bars from feeling too dense—look for plain, unsweetened versions if possible.
- Brown rice syrup: Acts as a natural sweetener and binder; it’s less sticky than honey but very effective in holding the bars together.
- Vanilla extract: A splash brings warmth and depth to the flavor that anyone can appreciate.
- Sea salt: Enhances the chocolate’s richness and balances the sweetness perfectly—don’t skip it!
- Dark chocolate chips: Choose high-quality dark chocolate (60-70% cacao) for that satisfying bittersweet edge.
- Coconut oil: Helps the chocolate melt smoothly and binds the bar ingredients—using virgin coconut oil gives a subtle tropical hint.
- Flaky salt for topping (optional): Adds a gourmet touch and a beautiful finish.
Variations
I like to mix things up depending on what’s in my pantry or what mood I’m in for snacking. This recipe is super flexible, so don’t hesitate to personalize it to your taste or dietary needs.
- Nut swaps or additions: I’ve tried pecans and walnuts for a deeper, earthier profile; experimenting can keep these bars exciting.
- Sweetener alternatives: Maple syrup or honey works well, but remember this might change the binding slightly, so add a little less liquid elsewhere.
- Raw cacao nibs instead of chocolate chips: For an extra punch of intense chocolaty crunch without extra sweetness.
- Make it vegan: Just double-check your chocolate is dairy-free and use maple syrup or brown rice syrup only.
- Add dried fruit: Toss in cranberries or chopped dates for a chewy contrast to those crunchy nuts.
How to Make Dark Chocolate and Sea Salt Nut Bars Recipe
Step 1: Toast the Nuts and Prepare the Puffed Rice Mix
Start by preheating your oven to 350°F (175°C) and spreading your mixed unsalted nuts evenly on a baking sheet. Toast them for about 10 minutes, until they’re golden and fragrant—this really amps up the flavor. Once toasted, toss them together with the puffed rice in a large bowl. Toasting is a simple step that makes a massive difference, so don’t skip it. Also, keep an eye on the nuts to avoid burning since ovens can vary!
Step 2: Combine the Syrup, Vanilla, and Salt
In a small saucepan, gently warm the brown rice syrup just enough to loosen it, then stir in the vanilla extract and sea salt. Mixing these wet ingredients separately helps them blend evenly with the nuts and puffed rice later. It’s tempting to rush, but warming the syrup slightly will make mixing easier so everything binds perfectly.
Step 3: Mix Nuts with the Syrup Blend
Pour the syrup mixture over the toasted nuts and puffed rice, stirring thoroughly to coat every bit evenly. Use a sturdy spoon or spatula—this part can get sticky. You want all those beautiful textures held together nicely, so don’t skimp on mixing here.
Step 4: Melt the Dark Chocolate with Coconut Oil
While the nut mixture cools a tad, melt your dark chocolate chips and coconut oil together in a double boiler or a microwave in short bursts (about 20 seconds each, stirring often). The coconut oil gives the chocolate a smoother texture and keeps it soft when packaged. If you overheat, the chocolate might seize, so slow and steady wins here.
Step 5: Assemble and Chill
Press the nut and puffed rice mixture firmly into a lined 8×8 inch pan. Pour the melted chocolate over the top, spreading it evenly to create a glossy, irresistible layer. Sprinkle flaky salt on top if you like that extra pop. Then pop it in the fridge for at least an hour to set properly. Firm pressure while pressing helps the bars hold their shape, so treat this like you’re packing a suitcase—compress but don’t crush.
How to Serve Dark Chocolate and Sea Salt Nut Bars Recipe
Garnishes
I usually keep it simple with just a sprinkle of flaky sea salt on top after pouring the chocolate. It enhances the salty-sweet combo beautifully. Occasionally, I’ll add a few whole nuts or a light dusting of cocoa powder for a bit of extra presentation flair.
Side Dishes
These bars stand well on their own but pair wonderfully with a cup of coffee or tea for a midday treat. For something more substantial, try them alongside Greek yogurt topped with fresh berries—the combo of creamy, fruity, and crunchy is a winner every time.
Creative Ways to Present
For special occasions or gifting, I like to cut the bars into smaller bite-sized squares and arrange them in a pretty box lined with parchment paper, maybe adding a ribbon. You can also drizzle extra melted white chocolate over the top for contrast or sandwich two bars together with a layer of nut butter for a decadent twist.
Make Ahead and Storage
Storing Leftovers
I keep leftover bars in an airtight container in the fridge to maintain their crunch and keep the chocolate from melting. They’ll stay fresh for about a week, making for convenient, grab-and-go snacks that never disappoint.
Freezing
Freezing these bars works great if you want to make extras. I wrap individual pieces in parchment or plastic wrap and place them in a freezer-safe bag. When you’re ready for a snack, just thaw at room temperature for 15-20 minutes—easy and convenient for meal prep.
Reheating
Since these bars are best enjoyed cold or at room temperature, I usually skip reheating. But if you prefer a slightly melty chocolate texture, a quick 5-10 second zap in the microwave does the trick—just watch carefully so they don’t get too soft or sticky.
FAQs
-
Can I use other nuts besides cashews, peanuts, and almonds?
Absolutely! The Dark Chocolate and Sea Salt Nut Bars Recipe is very flexible—you can swap in walnuts, pecans, pistachios, or any nuts you enjoy. Just be sure to toast them to enhance their flavor.
-
Is brown rice syrup necessary, or can I use honey?
You can substitute honey or maple syrup, but keep in mind the texture and binding might be slightly different since these syrups are more liquid. Brown rice syrup provides a great stickiness without excessive sweetness.
-
How do I prevent the chocolate topping from cracking?
Make sure to melt the chocolate and coconut oil slowly and pour it over the bars while still slightly warm. Also, keep the bars chilled but avoid freezing, as freezing and thawing cycles can cause cracks.
-
Can I make these bars nut-free?
For a nut-free version, you can substitute seeds like pumpkin, sunflower, or flax seeds in place of nuts. The texture and flavor will differ, but it’ll still be delicious and satisfying.
-
How long do Dark Chocolate and Sea Salt Nut Bars last?
Stored in an airtight container in the fridge, they stay fresh for up to a week. If frozen properly, you can extend their life up to 3 months.
Final Thoughts
I have to say, this Dark Chocolate and Sea Salt Nut Bars Recipe has become a staple in my kitchen for good reason. It’s that perfect combination of wholesome ingredients and indulgent flavor that leaves you feeling nourished, not overstuffed or guilty. I’m confident once you try making them at home, with these tips and tricks from my own experience, you’ll find yourself reaching for these bars more often than the store-bought versions. So grab your favorite nuts and let’s get to snacking—your future self will thank you!
Print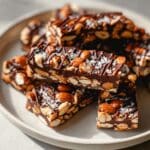
Dark Chocolate and Sea Salt Nut Bars Recipe
- Prep Time: 10 minutes
- Cook Time: 10 minutes
- Total Time: 1 hour 20 minutes
- Yield: 12 bars 1x
- Category: Snack
- Method: No-Cook
- Cuisine: American
- Diet: Gluten Free
Description
These Dark Chocolate and Sea Salt Nut Bars combine a crunchy blend of nuts and puffed rice with the rich taste of dark chocolate and a hint of sea salt, creating a delicious and satisfying snack perfect for on-the-go energy or a sweet treat.
Ingredients
Nuts and Dry Ingredients
- ¾ cup cashews
- ¾ cup peanuts
- 1 cup almonds
- ½ cup puffed rice
- ½ teaspoon sea salt
Wet Ingredients
- ¼ cup brown rice syrup
- 1 ½ teaspoon vanilla extract
Chocolate Coating
- 1 cup dark chocolate chips
- 2 teaspoons coconut oil
- Optional: flaky sea salt for topping
Instructions
- Prepare the Nut Mix: In a large bowl, combine the cashews, peanuts, almonds, puffed rice, and sea salt. Mix well to evenly distribute the salt through the nuts and puffed rice.
- Add Wet Ingredients: Pour the brown rice syrup and vanilla extract over the nut mixture. Stir thoroughly until all the nuts and puffed rice are coated with the syrup and vanilla, helping bind the mixture together.
- Press Mixture into Pan: Line a baking pan or tray with parchment paper. Transfer the nut mixture onto the pan, firmly pressing it down into an even layer to ensure the bars hold together well.
- Melt the Chocolate Coating: In a microwave-safe bowl or using a double boiler, melt the dark chocolate chips together with the coconut oil until smooth and glossy.
- Apply the Chocolate: Pour the melted chocolate mixture evenly over the pressed nut layer. Use a spatula to spread the chocolate, covering the entire surface. If desired, sprinkle flaky sea salt on top to enhance the flavor.
- Chill to Set: Place the pan in the refrigerator for at least 1 hour or until the chocolate is completely set and firm to the touch.
- Cut and Serve: Once set, remove the nut bars from the pan using the parchment paper. Cut into desired bar sizes and store in an airtight container, preferably refrigerated, to maintain freshness.
Notes
- Use a mix of nuts based on preference or availability; other nuts like walnuts or pecans work well.
- The brown rice syrup acts as a natural sweetener and binder; honey or maple syrup can be used as alternatives.
- Make sure to press the mixture firmly in the pan to ensure the bars hold their shape.
- Store bars in the fridge to keep the chocolate coating from melting and to prolong shelf life.
- For a nut-free option, substitute nuts with seeds such as pumpkin or sunflower seeds.
Keywords: dark chocolate nut bars, sea salt chocolate bars, homemade energy bars, gluten free snack, no-bake nut bars