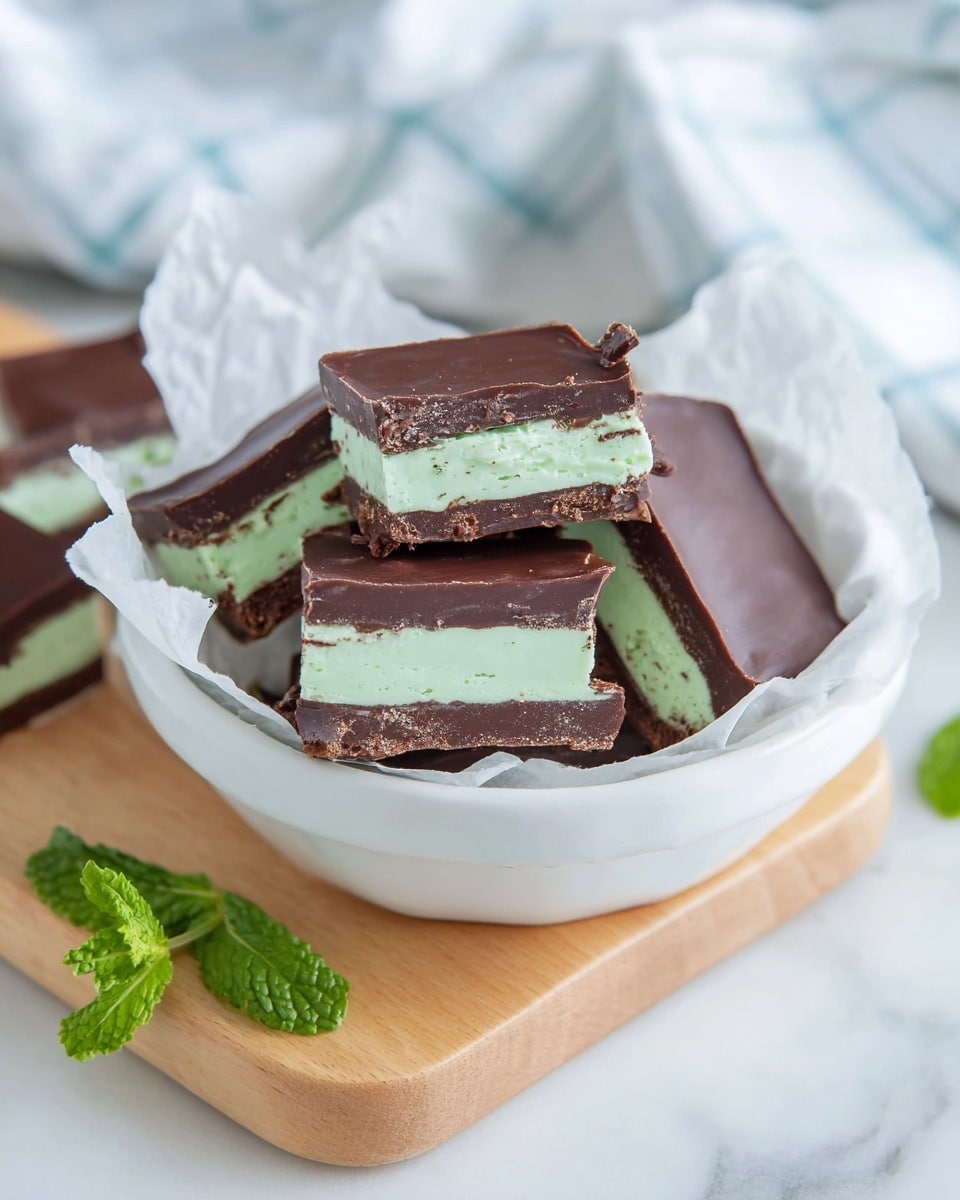
Copycat Andes Mints Recipe
Oh, if you’re anything like me and have a soft spot for those luscious Andes Mints, then you’re in for a treat. Making a Copycat Andes Mints Recipe right at home is one of those little kitchen adventures that feels fancy but is really quite simple. What I love about these little minty chocolate squares is how perfectly refreshing and creamy they are—ideal for sharing at holiday parties, slipping into an afternoon coffee break, or just indulging when you need a little pick-me-up.
What makes this Copycat Andes Mints Recipe so worth trying yourself is the ability to tailor the minty chocolate flavor exactly how you like it and control the ingredients. Plus, when you have these fresh and homemade, you don’t have to worry about preservatives or artificial flavors—they’re just pure joy in every bite. Trust me, once you make these, tossing aside the store-bought versions will become second nature.
Ingredients You’ll Need
The ingredients for this recipe complement each other beautifully, creating that signature layers of chocolate and mint. You’ll find the shopping list is pretty straightforward too—nothing fancy required. Just grab good quality chocolate chips for the best texture and flavor, and you’re set to go.
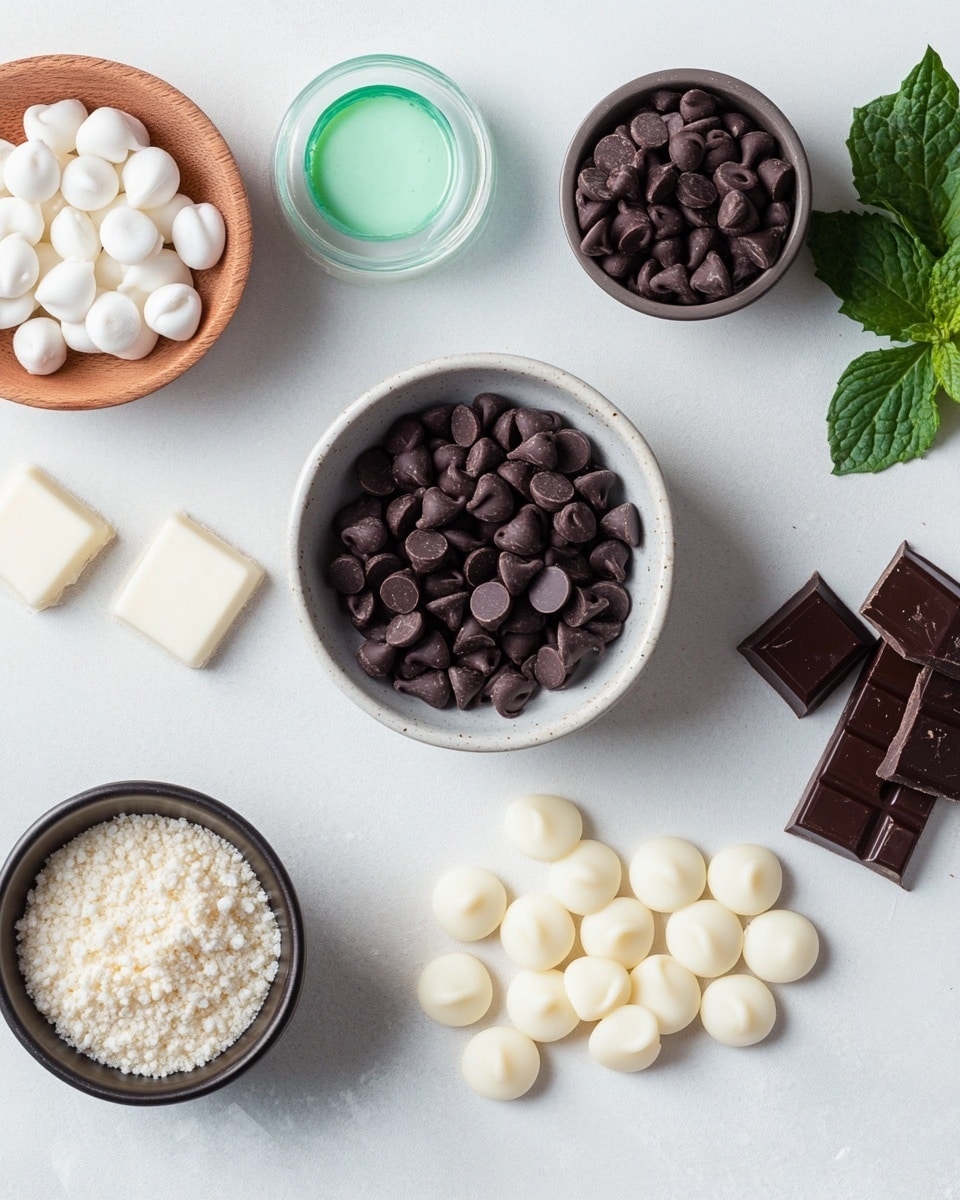
- Dark chocolate chips: I prefer a good quality dark chocolate for the bottom and top layers—it adds serious depth and counters the sweetness of the white chocolate.
- White chocolate chips: You’ll only use about half of these for the mint layer. Make sure to get white chocolate chips instead of candy melts for a rich, creamy texture.
- Peppermint extract: This is the magic ingredient—just a teaspoon gives these mints that fresh, crisp flavor. Be careful not to overdo it; peppermint extract is super strong.
- Green gel food coloring: This adds that classic Andes Mint green without watering down the mixture like liquid food coloring would. It’s all about that beautiful visual appeal.
Variations
I love making this Copycat Andes Mints Recipe my own by playing around with flavors and textures. A few tweaks here and there can really make it fit any occasion or dietary need, so don’t be afraid to experiment and make it yours.
- Mint intensity variation: Sometimes I add extra peppermint extract or swap in fresh crushed peppermint leaves for a stronger, all-natural mint flavor.
- Dairy-free version: Using dairy-free white chocolate and dark chocolate chips works beautifully, and the texture stays just as smooth!
- Chocolate mix-up: I’ve tried bittersweet chocolate chips instead of dark chocolate for a slightly sweeter top and bottom layer, and it’s delicious too.
How to Make Copycat Andes Mints Recipe
Step 1: Melt the Dark Chocolate Base
Start by melting your dark chocolate chips gently—either in a microwave-safe bowl in 30-second increments or using a double boiler. Stir between intervals until smooth and shiny. This step is key for texture, so don’t rush it! Pour the melted dark chocolate into your lined pan and spread it evenly to form the bottom layer. Pop it in the fridge to firm up while you prepare the mint layer.
Step 2: Create the Mint Layer
Here’s where the magic happens. Melt about half of your white chocolate chips the same way as before. Once melted, stir in the peppermint extract and a few drops of green gel food coloring until you get that perfect pastel green. Doesn’t it feel like summer already? Spread the minty white chocolate layer over the set dark chocolate base and refrigerate again until it hardens.
Step 3: Top with Dark Chocolate
Finally, melt the remaining dark chocolate chips as you did in Step 1. Pour this over the mint layer, smoothing gently with a spatula so the layers are neatly stacked. Refrigerate one last time until the whole thing is firm to the touch—usually about an hour or so. Once ready, slice into those classic little rectangles and get ready to savor every bite!
How to Serve Copycat Andes Mints Recipe
Garnishes
I enjoy sprinkling a tiny pinch of crushed peppermint candy or sea salt flakes on top for a nice contrast to the creamy layers. Sometimes, a dusting of cocoa powder or edible gold flakes makes it feel extra special if I’m serving guests.
Side Dishes
Pairing these with a hot cup of coffee or a fresh mint tea brings out the minty freshness beautifully. They also complement rich desserts like flourless chocolate cake or vanilla bean ice cream if you’re aiming for a dessert tray.
Creative Ways to Present
For special occasions, I like to stack these Copycat Andes Mints on a mirrored tray with some fresh mint leaves scattered around for a classy look. Wrapping each mint individually in wax paper tied with a little ribbon is also a charming way to gift them during the holidays.
Make Ahead and Storage
Storing Leftovers
I store leftover mints in an airtight container in the fridge to keep the chocolate crisp and the layers distinct. They stay fresh for about 2 weeks this way, perfect for nibbling whenever a craving hits.
Freezing
Freezing is a great option if you want to keep these Copycat Andes Mints Recipe delights longer. I wrap them individually in parchment paper and place them in a freezer-safe bag. When thawed, they taste just as good as fresh, no texture loss.
Reheating
Since these are chocolates, reheating isn’t really needed, but if the mints get a bit firm from the fridge, let them sit at room temperature for about 10 minutes before serving. That softens the texture just right.
FAQs
-
Can I use regular food coloring instead of gel for the mint layer?
You can, but gel food coloring is best because it won’t thin out the white chocolate. Regular liquid food color might make the chocolate seize or become too runny, affecting texture and final appearance.
-
How do I avoid my white chocolate from seizing when melting?
Be patient and melt white chocolate slowly using short bursts in the microwave or a double boiler over low heat. Stir frequently, and never let water touch the chocolate, as moisture causes seizing.
- Can I substitute peppermint extract with peppermint oil?
Yes, but peppermint oil is much stronger than extract, so use only half the amount or even less to avoid overpowering the mint layer.
- Why is my mint layer not firming up properly?
Make sure you’ve refrigerated the mint layer long enough and that the chocolate is fully melted and smooth before setting. Also, using good quality white chocolate chips ensures better firmness.
Final Thoughts
Making this Copycat Andes Mints Recipe has been a delightful experience every time I whip it up. It feels like you’re channeling a little chocolate magic in your kitchen, and sharing these minty treasures always brings so much joy. I encourage you to try your hand at these mints—once you get the hang of layering and melting, they come together beautifully, and you’ll wonder why you ever bought the store-bought ones. So go ahead, indulge a little and enjoy that fresh, homemade peppermint-chocolate bliss.
Print
Copycat Andes Mints Recipe
- Prep Time: 15 minutes
- Cook Time: 30 minutes (including melting and cooling times)
- Total Time: 1 hour 15 minutes
- Yield: Approximately 40 mints 1x
- Category: Dessert
- Method: No-Cook
- Cuisine: American
Description
This Copycat Andes Mints recipe allows you to recreate the iconic, delicious mint chocolate treat at home. With layers of smooth dark chocolate and a creamy, peppermint-flavored white chocolate center colored with a vibrant green gel, these mints are perfect for satisfying your sweet cravings or impressing guests with a homemade classic.
Ingredients
Chocolate
- 11 ounces dark chocolate chips
- 11 ounces white chocolate chips (use about half)
Flavorings and Color
- 1 teaspoon peppermint extract
- Green gel food coloring (amount as needed for desired shade)
Instructions
- Prepare the white chocolate mint layer: Melt about half of the white chocolate chips slowly over a double boiler or in the microwave in short bursts, stirring frequently until smooth. Stir in the peppermint extract and a few drops of green gel food coloring until you achieve the desired vivid green color. Pour the mixture into a parchment paper-lined baking dish or mold to a thickness of about 1/4 inch. Refrigerate until firm, approximately 30 minutes.
- Prepare the dark chocolate layers: While the mint layer is chilling, melt the dark chocolate chips using the same method—double boiler or microwave, stirring often for a smooth finish. Once fully melted, remove from heat.
- Assemble the mints: Once the mint layer is completely set, carefully pour half of the melted dark chocolate over the mint layer, smooth it out evenly, and refrigerate until firm, about 15 minutes. Then, spread the remaining melted dark chocolate on top to form the second chocolate layer. Return to the refrigerator and chill until fully set, at least 30 minutes.
- Cut and serve: After the chocolate layers have hardened completely, remove from the mold or baking dish. Using a sharp knife, cut into rectangles or squares resembling the classic Andes mint shape. Store in an airtight container in the refrigerator for best freshness.
Notes
- Use high-quality chocolate for best flavor and smooth texture.
- Be sure to stir the chocolate frequently while melting to avoid burning or seizing.
- Adjust the amount of green gel food coloring based on desired color intensity.
- Keep the finished mints refrigerated to maintain their shape and texture.
- You can line your mold or baking dish with parchment paper to make removal easier.
Keywords: copycat Andes mints, homemade Andes mints, peppermint chocolate mints, layered chocolate mint recipe, easy mint chocolate treats